Teaching an Old Ender 3 New Speeds
Nov 12, 2026
My first 3D printer is an Ender 3 V2. Since a Bambu P2S arrived, the Ender has been the slow second printer: it makes the parts the P2S doesn't have time for, at about half the speed. A month ago I looked at moving it to Klipper, decided to sort out its leveling and extrusion first, then bought the P2S and forgot about it. This week I finally did it, in one evening, with a Claude Code session writing the scripts and configuration and me doing everything that needed sudo or hands.
Why it was slow
The Ender ran Creality's stock Marlin firmware, and the slicer profile was just as cautious: 500 mm/s² acceleration and outer walls at 25 mm/s. Most of a print is short moves, and at that acceleration the print head never gets near its top speed.
Before touching anything, I sliced the same two parts three ways in Bambu Studio. For the current profile, the estimate matched the real print time.
| Setup | Watch charger module | Two cable holders |
|---|---|---|
| Today: stock profile, 500 mm/s², walls 25–40 mm/s | 2 h 50 min | 2 h 08 min |
| Same firmware, faster profile: 1000 mm/s², walls 40–60 | 2 h 05 min | 1 h 32 min |
| Klipper with resonance compensation: 3000 mm/s², walls 80–120 | 1 h 25 min | 1 h 02 min |
The P2S prints the same watch module in 1 h 19 min. The last row runs into the hot end's limit, about 12 mm³/s of plastic, so it's close to as fast as this machine can go.
A faster profile alone would help, but pushing acceleration on stock firmware just makes ringing worse: the frame shakes after every corner and leaves ripples on the walls. Klipper fixes that with input shaping: it measures the frame's resonance and shapes each move so it doesn't excite it. That's the part worth the trouble.
One thing had to come first. The Ender had been extruding thin lines for weeks, and it turned out the plastic extruder arm had cracked. With a metal one in, the extrusion was fine, so the speed was the only problem left.
The plan: keep OctoPrint
Klipper splits the firmware in two. The printer's board runs a small program that only steps motors and reads sensors, and a Python program on a computer next to it does all the planning. The Ender already has a Raspberry Pi 4 running OctoPrint, and a lot hangs off OctoPrint: a status page, alerts when a print finishes, and a failure detector that watches the camera. All of them talk to OctoPrint's API.
So the plan kept OctoPrint exactly as it was. Klipper's host program runs on the same Pi and exposes a virtual serial port, and OctoPrint connects to that instead of to the printer's USB port. Everything downstream keeps working, because OctoPrint still sends the G-code.
First, a new Pi system
The Pi's system was older than I thought: OctoPi 0.18 on Raspbian buster, with Python 3.7, and buster's package mirror has been shut down, so apt-get update failed. Klipper could have been forced onto it, but I had a spare 128 GB card, so the first job became a fresh OctoPi 1.1.0, on Debian bookworm with Python 3.11.
The session listed everything worth carrying over: OctoPrint's own backup (without 2.2 GB of timelapse videos), the status page and its two cron lines, and the camera. The new OctoPi uses a different camera streamer, so we checked that the stream and snapshot URLs the monitors rely on still answered. Two and a half hours after the decision, the Ender was printing from the new card as before.
Flashing the board
The firmware build depends on the board, so I turned the printer on its side and opened the bottom: a v4.2.2 board with an STM32 chip, the combination Klipper's own Ender 3 V2 config is written for. The session built the firmware on my Mac in a Debian container, with the settings from the top of that config file, and gave it a name the board had never seen. The board's bootloader skips a file whose name it has already flashed, which catches a lot of people.
The old Pi card, formatted as FAT32, became the flashing card, and the board took the firmware on the first try. The stock screen now stays dark: Klipper doesn't drive it, so from here on everything happens in the browser.
On the Pi, the session set up Klipper's host program at the same commit as the firmware, as a service that starts at boot. The printer config started from Klipper's official Ender 3 V2 file, with acceleration capped at 1000 for now. Then OctoPrint was pointed at Klipper's port, and the temperatures came back.
One annoyance stays: every time Klipper restarts, for example after saving a setting, OctoPrint drops to "Offline" and has to be reconnected by hand.
Checking the basics
Each step that heats or moves the printer started only after I confirmed I was standing next to it.
- Homing. Each axis moved the right way and stopped at its switch. The config homes Z only after lifting the nozzle 10 mm, so it can't drag across the bed.
- PID tuning. Klipper ran its heater test for the nozzle at 205 °C and the bed at 60 °C, and saved the results.
- Extrusion. I marked the filament, the printer fed 100 mm at 1 mm/s, and I measured exactly 100 mm. The new metal extruder arm needed no correction.
Then a 20 mm test cube, at the old speed for the first layers and 150% after that: about 26 minutes, and the "print done" alert arrived as before. The top had a ring of small holes and the corners bulged a little, the typical look of a printer without pressure advance, which comes later.
Measuring the shake
Input shaping needs the frame's resonant frequencies. I had a GY-521 board in a drawer, an MPU-6050 accelerometer that Klipper supports, and wired it to the Pi's I2C pins with four jumper wires. On the first try I swapped power and ground, and the chip got hot. It survived.
The Pi then runs as a second Klipper "board" that reads the sensor. Klipper sweeps each axis through a range of frequencies and records how hard the sensor shakes:
- X: the sensor sits on the print head. Before trusting any numbers, we moved each axis back and forth and checked which sensor axis responded, since the board was mounted upright. One more surprise: with the sensor on the head, homing failed a few times because the board got in the way of the switch, and a failed homing makes OctoPrint send an emergency stop. We disconnected OctoPrint during the tests.
- Y: the sensor lies on the bed, with the nozzle raised out of its way.
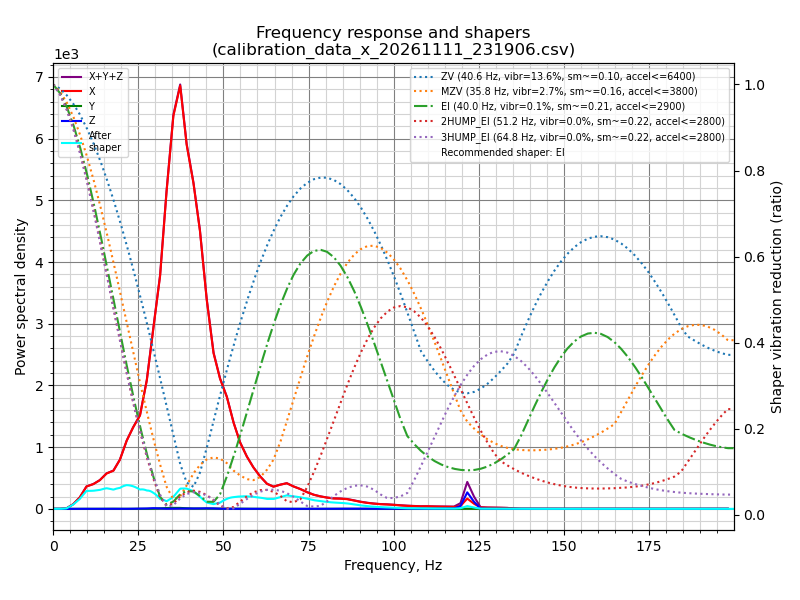
X axis: one clear resonance just under 40 Hz. Klipper recommends the EI shaper at 40 Hz, which leaves 0.1% of the vibration, at up to 2,900 mm/s².
The first Y measurement showed a single peak around 33 Hz, but recommended a shaper tuned to 51 Hz. That didn't look right to me, so we ran it again. The peak was in the same place, and this time the recommendation matched it: MZV at 32.6 Hz.
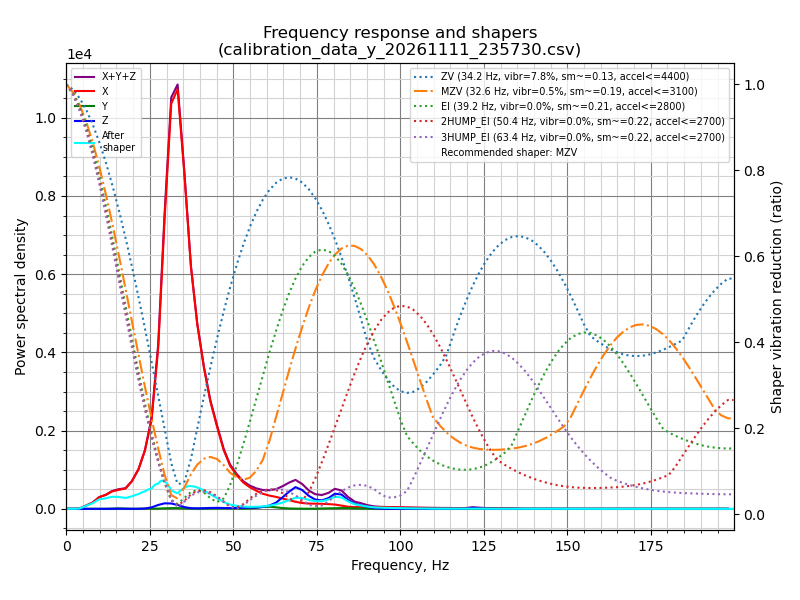
Y axis, second run: one sharp peak at 33 Hz. MZV at 32.6 Hz leaves 0.5% of the vibration, at up to 3,100 mm/s². The bed is the heavier moving part, which is probably why it resonates lower than the head.
One acceleration setting covers both axes, so it has to respect X's lower limit: the printer's maximum went from 1000 to 2,800 mm/s², close to six times the old profile's 500.
Pressure advance
The holes and bulges on the test cube have the same cause. The Ender pushes filament through a long Bowden tube to the hot end, so the pressure in the nozzle lags behind the extruder motor. When the head slows down for a corner, the nozzle keeps oozing and the corner bulges; when it speeds up again, it comes out short. Pressure advance makes the extruder push a little extra while the head accelerates and back off while it slows down, in proportion to how fast the speed changes.
The right amount depends on the machine, so Klipper measures it with a tuning tower: a hollow square, 66 by 66 mm and 50 mm tall, with two walls, no infill and no top, printed at 100 mm/s. For the test, acceleration drops to 500 and corners are taken almost at a stop, so the only thing changing up the tower is the pressure advance setting. It starts at 0 at the bed and rises by 0.02 per millimeter, reaching 1.0 at the top. You then look for the height where the corners are sharpest without the walls next to them going thin.
The best corners were at 32 mm, so pressure advance is now 0.64, in the usual 0.4 to 0.8 range for a Bowden printer. A restart afterwards cleared the test limits.
What's left
- A new slicer profile. It has to call Klipper's start macro, use the new speeds and accelerations, and keep the layer-change markers that the status page counts.
- The real test. I'll print the watch charger module from the table at the new speeds and see whether 2 h 50 min really becomes about 1 h 25 min.
There's no easy way back to the old system: the old Pi card became the flashing card. That was a deliberate choice. The configuration is saved separately, and Creality's stock firmware is one SD card away if Klipper ever has to go.