You Get What You Pay For, Plus Extra Yellow
Nov 1, 2026
Lately I've been printing a lot of Wukong & Friends books to read with my daughter, and the color laser printer at home ran out of toner. Genuine cartridges cost about five times as much as third-party ones, so I bought third-party.
Every color print after that came out badly yellow. Gray backgrounds looked like old newspaper and skin looked jaundiced. On the printer's diagnostic page, cyan and magenta faded smoothly from solid to almost nothing, but the lightest yellow patches were nearly as yellow as the solid one.
The printer's built-in calibration did nothing at all. Its fine-tuning controls, which set each toner's density separately for highlights, midtones and shadows, helped but didn't fix it. That left software.
A print queue that re-colors the page
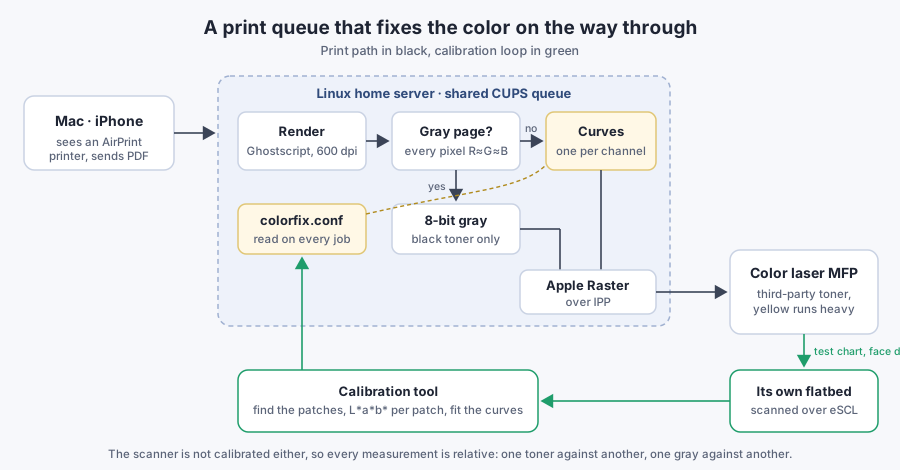
The proxy is an ordinary CUPS queue on the home server, advertised over Bonjour, so Macs and iPhones see it as just another AirPrint printer. One CUPS filter, about 260 lines of Python, does the work:
- Ghostscript renders each page at 600 dpi as RGB.
- A page where every pixel is gray goes out as 8-bit grayscale, so text documents use black toner only.
- A color page gets one tone curve per RGB channel. Pure black and pure white never change.
- CUPS writes the result as Apple Raster and sends it to the printer.
Each RGB channel roughly controls one toner: R is cyan, G is magenta, B is yellow. Raising B means less yellow. The proxy can only change the RGB it sends, though. It can't see how the printer turns that into toner, and it can't print a dot fainter than the printer's faintest.
Calibrating with the printer's own scanner
The printer has a flatbed scanner, reachable over the network, so the calibration tool closes the loop. It prints a test chart (gray, cyan, magenta, yellow, red, green and blue, 13 steps each), scans it, finds every patch and converts it to CIELAB. There, b* is the blue–yellow axis, so "too yellow" just means "b* too high". Then it fits new curves.
The scanner isn't calibrated either, so every measurement is relative: the yellow ramp against the magenta ramp, and composite gray against a second page that prints the same grays with black toner only.
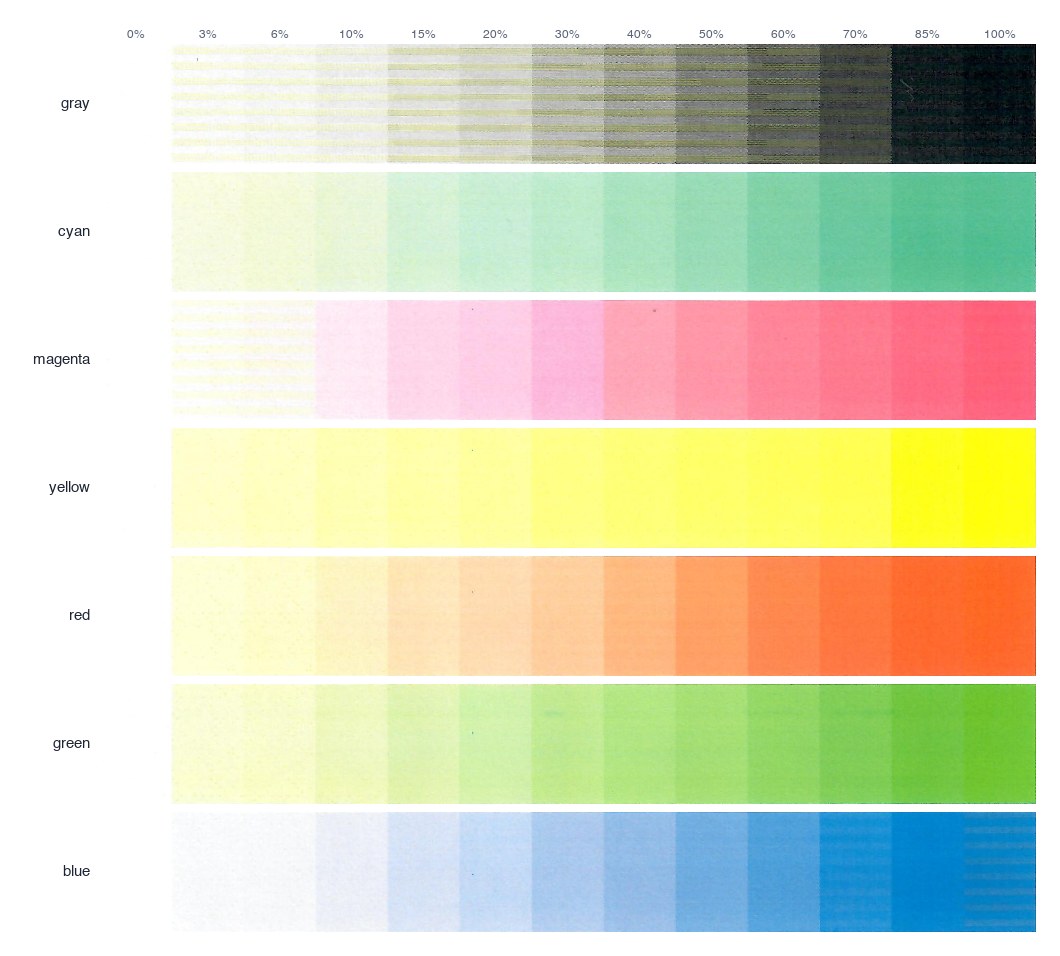
The uncorrected chart at the printer's default settings. The scanner isn't calibrated, so the colors are approximate, but the problems show.
The first scans confirmed what I saw, and turned up more:
- Light yellow far too strong. A 3% yellow patch measured b* 25 where the chart asks for about 4.
- Composite grays yellow-green, up to 10 b* units warmer than the black-only grays.
- Stripes. Grays came out in alternating yellow and gray bands every 2.66 mm. That is almost exactly 64 rows at 600 dpi, the strip height the printer reports over IPP. The proxy sends perfectly even grays, so the printer must be deciding strip by strip how to build them.
- Yellow that isn't in the file. Light cyan and light magenta printed yellowish even though they ask for no yellow at all. A CMYK chart sent straight to the printer did the same, while pure black patches just as light stayed neutral. So the printer itself adds a little yellow to pale cyan and magenta, and this toner magnifies it. No curve can take out yellow that gets added after the proxy.
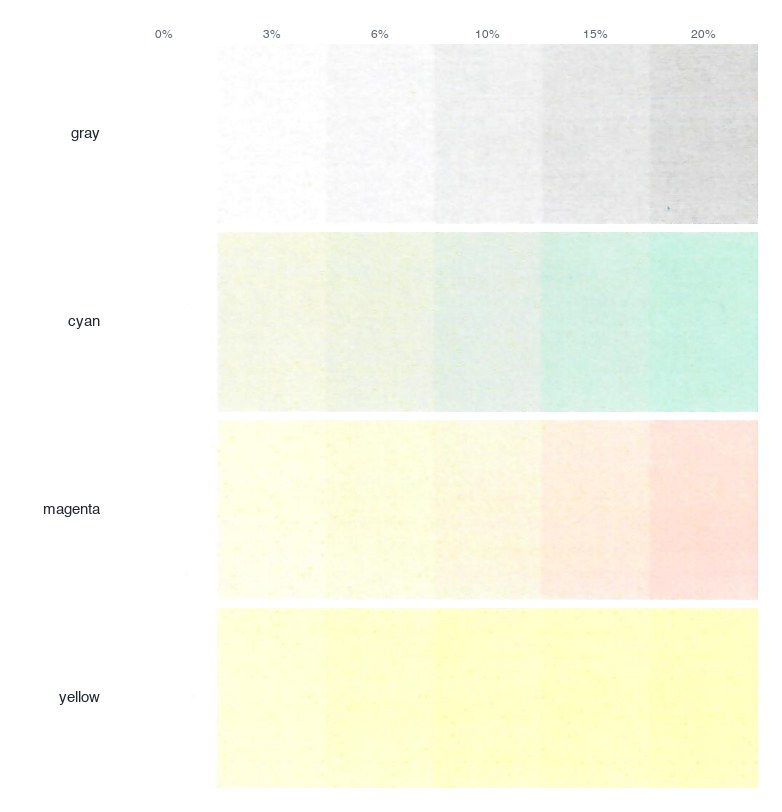
A CMYK chart sent straight to the printer. The cyan and magenta rows ask for zero yellow.
Curves alone weren't enough
The same B curve controls light yellow and the yellow in every composite gray, so a curve that fixed the yellow ramp turned the grays blue. Five passes went into the gray balance. Toward the end, the scanner called a gray neutral that I could plainly see was blue. A black-toner gray and a four-toner gray reflect light differently, and a scanner's filters aren't eyes. From then on, the last call on grays was mine, not the scanner's.
Back to the density controls, with numbers
With a scanner and a chart, I could now see what the printer's yellow density settings really did. Setting yellow highlights to −5 and midtones to −2 fixed a lot in one move. Grays came out neutral with no correction, the stripes were gone, and so was the yellow in light cyan and magenta: the printer can't lay down yellow that faint anymore, so its own little addition disappears along with it.
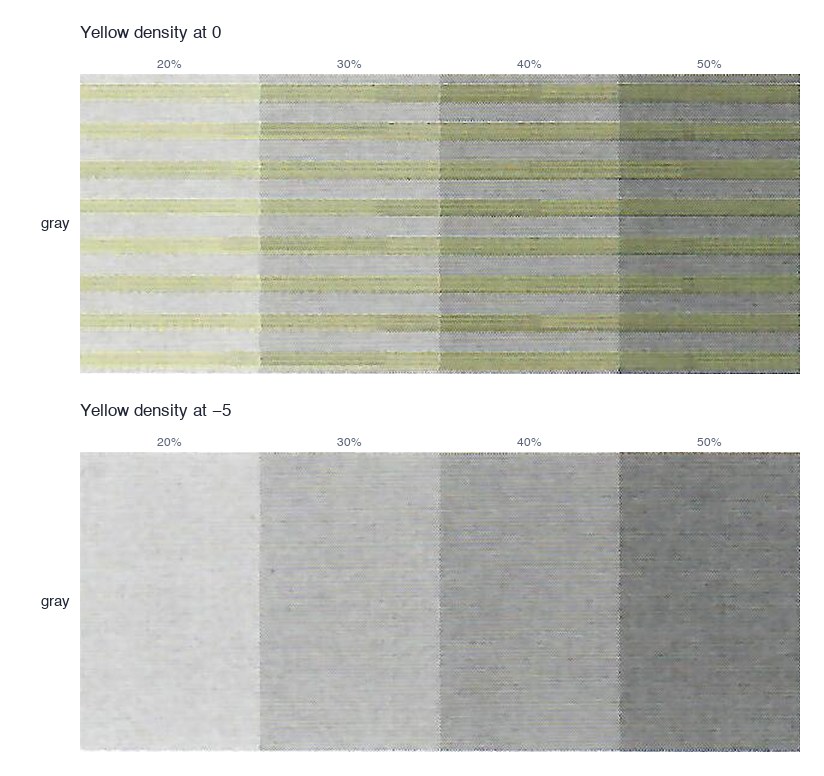
That shrank the proxy's job to tidying up, and I fitted each channel so every patch on the chart landed on the color it asks for.
A picture book overrules the scanner
Charts are not what I print, so I printed one page of a Wukong book twice, once straight to the printer and once through the proxy. Each won half. Wukong's and Pigsy's faces were right through the proxy and yellowish without it. The cream background was the other way around: through the proxy it had turned yellowish. The fit had added yellow to the palest tints because the scanner asked for it. Its exposure clips paper white, so the palest patches read paler than they really print. I took that boost back out. From then on, the last word on any change went to a page we actually read.
Then the printer moved
Near midnight a chart came out with olive grays. Nothing had changed on my side: the printer's settings read the same, and the proxy doesn't touch grays at all. The printer is set to recalibrate itself when it wakes up and every 48 hours, so it had most likely just done that.
So I ran the printer's own color calibration from its panel, the one that had done nothing at the start, and measured again:
| Yellow density | Grays vs black-only gray | 3% yellow (target b* 4) | 50% red hue (target 25°) | |
|---|---|---|---|---|
| Before recalibrating | All 0 | b* +7 to +11, striped | b* 25 | 58° |
| Highlight −5, midtone −2 | neutral | b* 0.2 | 52° | |
| After recalibrating | Highlight −5, midtone −2 | neutral | b* 0.1, nothing below 15% | 35° |
| All 0 | neutral, no stripes | b* 10 | 47° | |
| Highlight −2 only | neutral | b* 2 | 43° |
This time the calibration did most of the job. With every setting back at 0, grays were neutral and the stripes were gone, which was most of what I'd spent the day fighting. My −5 and −2 had been compensating for a printer that had now compensated by itself, so they made things worse: yellow below 15% vanished. A single −2 on yellow highlights put the light yellows close to their targets.
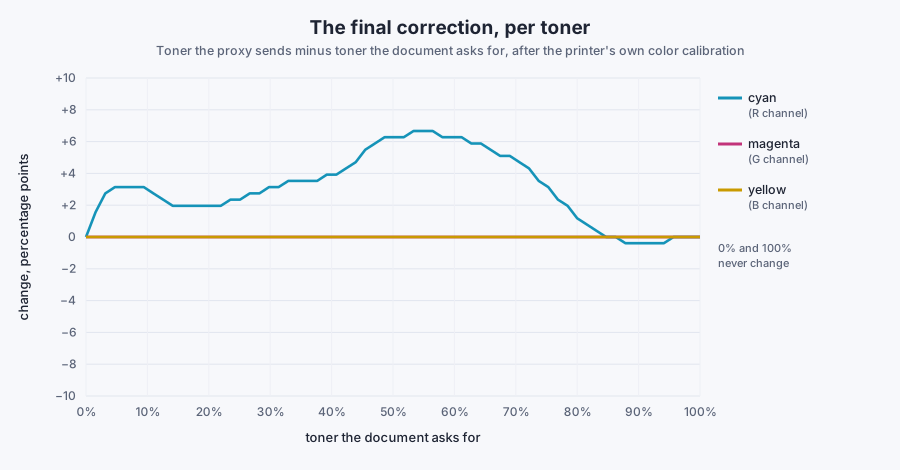
What was left was cyan. It now printed at only 65–70% of its target strength, so pale blues leaned purple and greens leaned yellow. The final proxy has one curve, on cyan: a few points more from 3% to 70%, and nothing else. Magenta, yellow and grays pass through untouched.
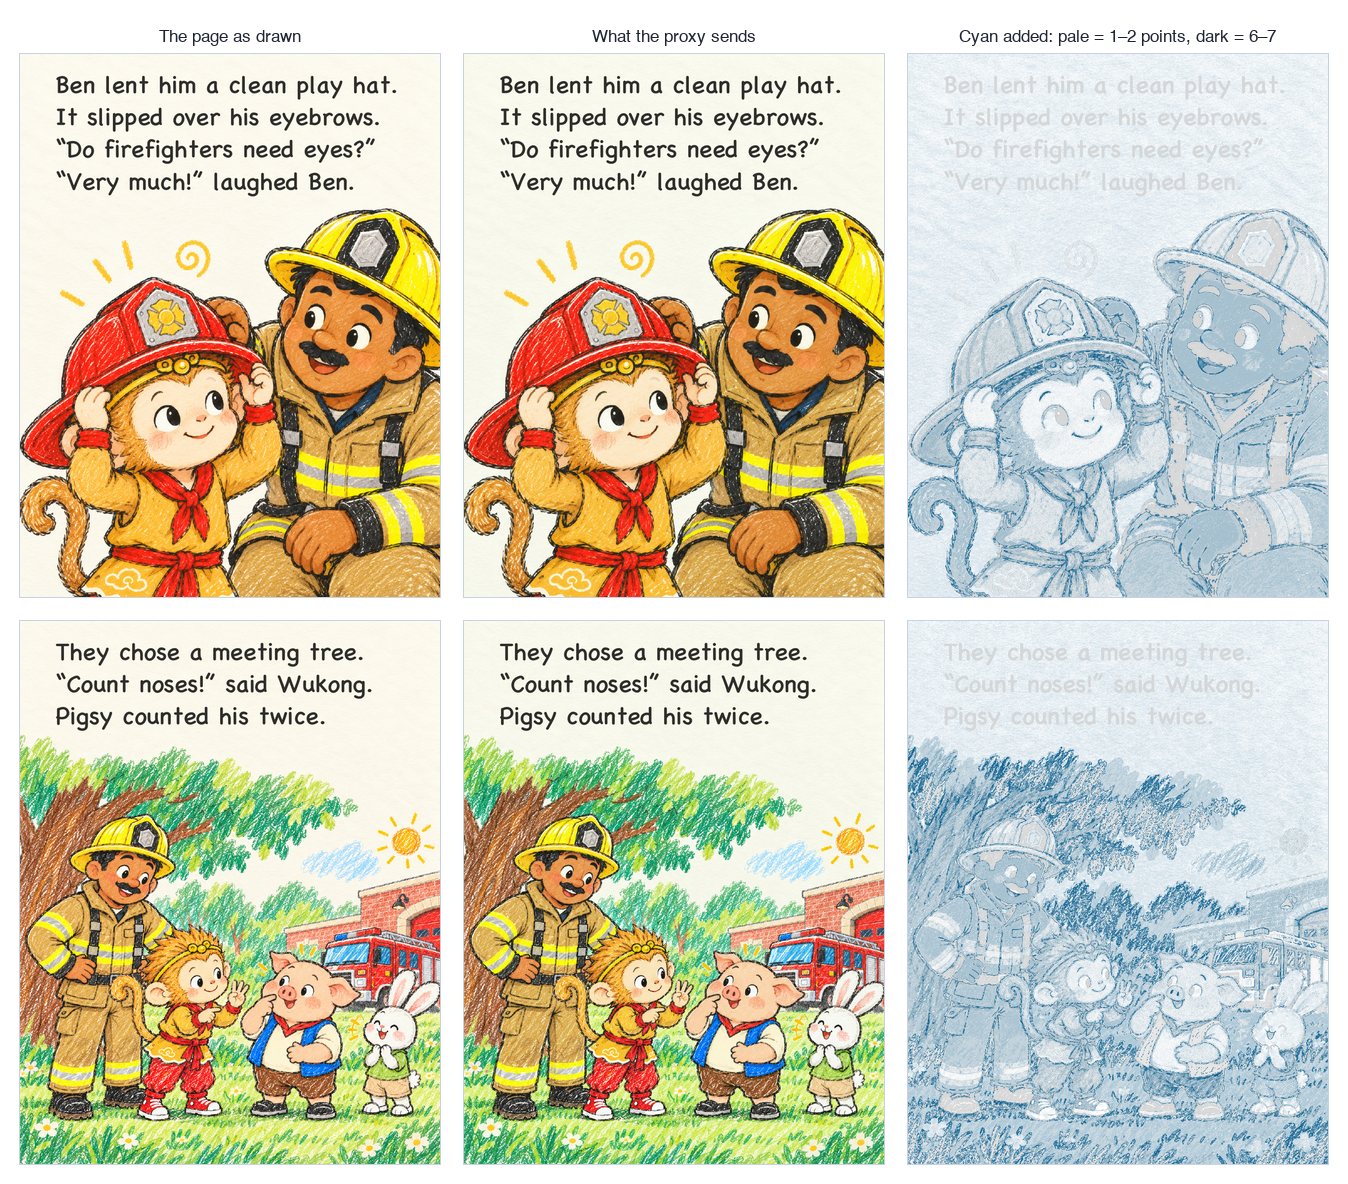
Left: the page as drawn. Middle: what the proxy sends, almost the same on screen. Right: where the proxy adds cyan. The leaves, the sky and the darker browns get the most; faces and the cream background get a point or two.
Was it worth it?
Partly, and not in the way I expected. The biggest fix was the printer's own calibration, run at the right moment. I'd tried it at the very start and seen no difference. My best guess is that the new cartridges hadn't settled in yet: a fresh cartridge's drum and toner take a while of printing to reach steady output, and a calibration run before then measures a printer that is still changing. By midnight, a few dozen pages later, it was measuring the printer I actually had. But without the scanner loop I wouldn't have noticed the printer drift, or known which settings to undo afterward.
The proxy ended up small: one curve, a few points of cyan. Third-party toner plus one small curve still costs a fifth of genuine toner, and the setup is ready for the next batch. Recalibrate the printer first, then print a chart, scan it, fit, and check a page we actually read. A few limits remain: the palest 3% tints sit right at the printer's threshold and vary from print to print, a 50% red is still a little orange, and a curve changes every color that contains its toner.
The lesson I'd take: recalibrate before you correct, and measure before you believe either. And when the scanner and a picture book disagree, the picture book wins.